Mass emails, or bulk emails, are messages sent simultaneously to multiple recipients. This allows you to reach a large audience efficiently with promotional and informational content.
Mass emails are also effective for securing strategic business opportunities, such as connecting with potential customers, initiating conversations with decision-makers at target companies, or securing opportunities for a link-building outreach.
And while there are various ways to send mass emails, doing so while respecting each recipient’s privacy is another ballgame altogether. So, this post will show you how to send mass emails to multiple recipients while maintaining privacy and professionalism.
Let’s get started.
How to Send Emails to Multiple Recipients Using Voila Norbert
Once you’ve gathered the email addresses of key decision-makers or leads you want to reach, here’s how to send a mass email to them using Voila Norbert.
Step 1: Set Up Your Voila Norbert Account
The first step is to create your Voila Norbert account, which you can do for free. The free version lets you send up to 2,500 emails per month. You’ll also get access to automated email sequences, email verification, unlimited email warmups, and AI copywriting.
Step 2: Go to Sequences
Open Voila Norbert and go to “Sequences.”
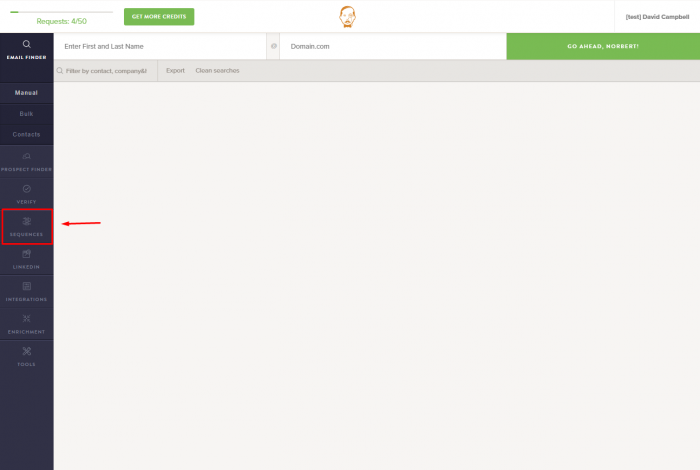
Step 3: Create Sequence
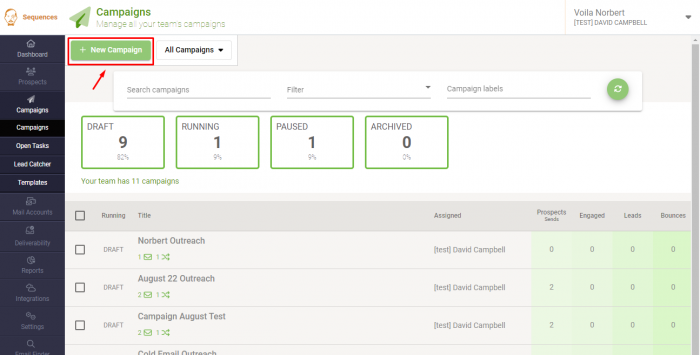
From the dashboard, click “Campaigns”
Step 4: Create a New Campaign
Click “New campaign”, input your campaign title, and confirm other details in the next window then click “Prospects.”
Step 5: Add Prospects
Choose the option to add prospects and click “Import.” Voila Norbert will prompt you to review your prospect list. Confirm the list and click “next.”
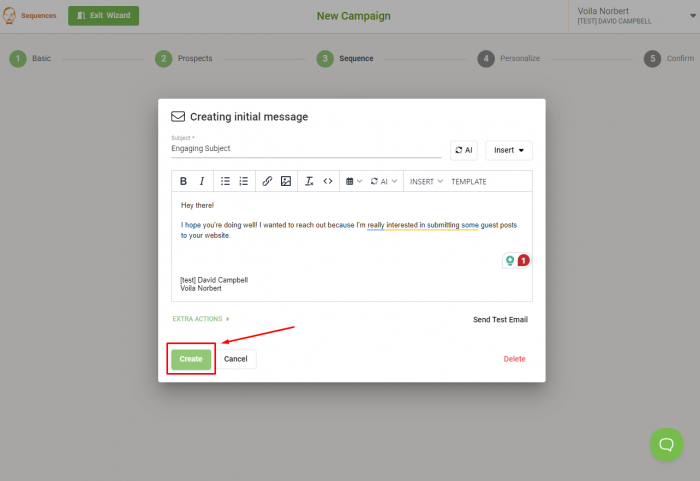
Step 6: Create a Campaign
Click “Create new campaign”, and select “email.” In the next window, draft your email content then click “Create.”
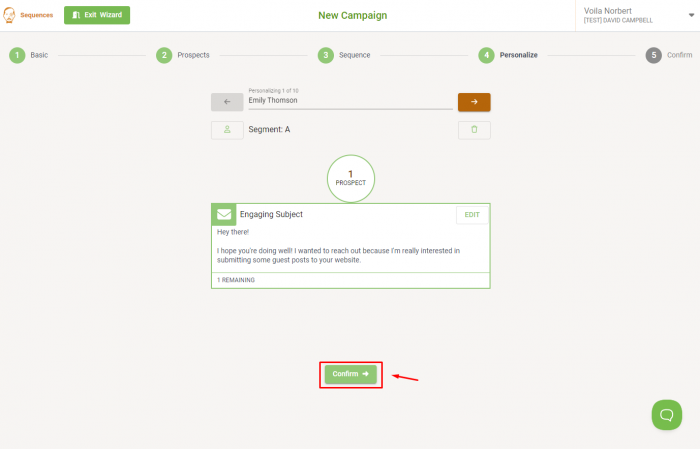
Step 7: Personalize Your Email
From the next window, click “Personalize” to add things like the recipients’ names. Confirm your email personalizations are accurate then go to the next step.
Voila Norbert also allows you to automate an email sequence. For instance, you can configure another email to deliver after a few days. Simply click the plus icon (+) in the sequence window.
Step 8: Send Your Email
Do a final check on your sender and recipient information. Then click “Start campaign” to send your email.
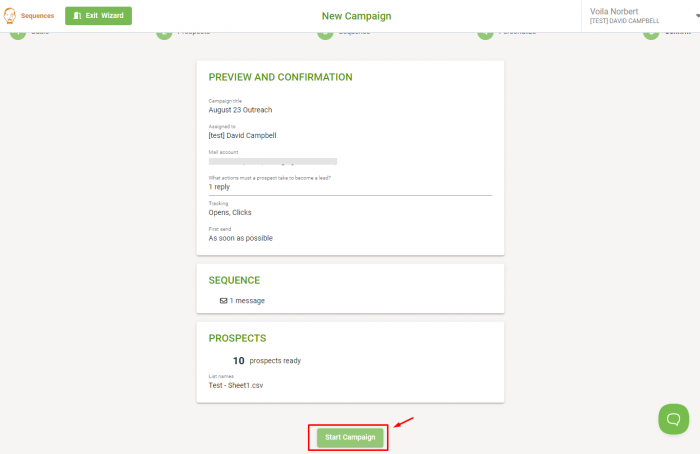
Remember, a clear subject line, straightforward copy, and clean signature are essential elements of an email. You should always prioritize them.
How to Email Multiple Recipients in Gmail
Here’s how to send mass emails to multiple recipients using Gmail:
Step 1: Compose your email
Open Gmail and click the “Compose” button to create a new email. Draft your email and remember to add a catchy subject line.
Step 2: Add Recipients to the BCC Field
You’ll find the BCC (blind carbon copy) option on the far right of the “To” field in your Gmail. Click on it. Then, input your recipient’s email addresses.
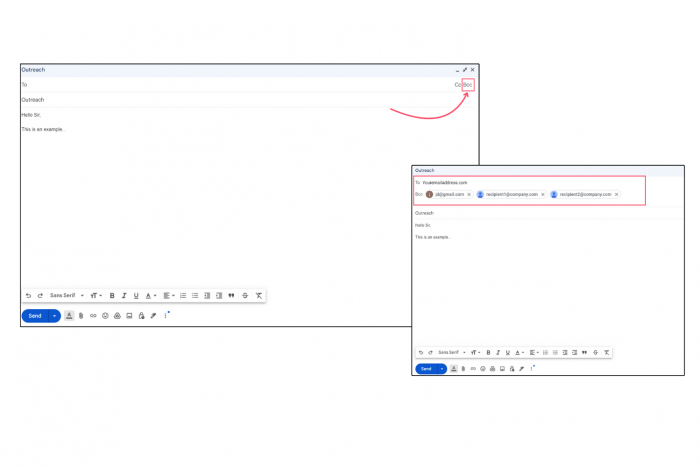
Using the BCC option, recipients will only see their email addresses when they receive your email (hence the word “blind” in “blind carbon copy”).
Also, since you can’t leave the “To” field blank, you can use your own email address.
Step 3: Proofread Your Email and Send
Look through your email copy to ensure that it looks good. Then click the send button.
How to Email Multiple Recipients in Outlook
Sending bulk emails to multiple contacts in Outlook is quite simple:
Step 1: Create a New Message
Open Outlook and click the “New email” button. This creates a new page to draft your email.
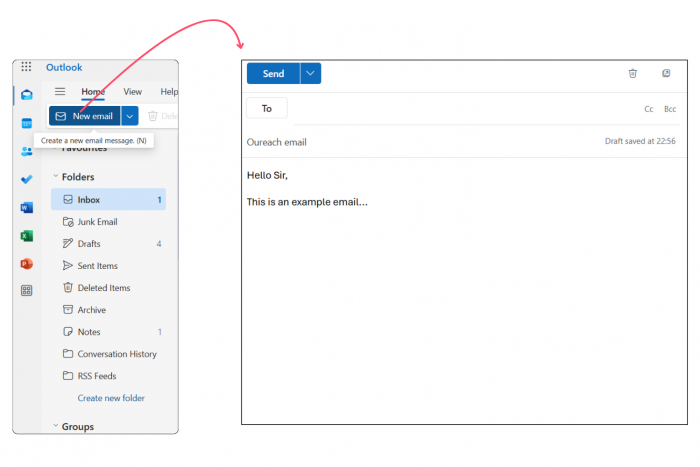
Step 2: Use “To” and “BCC” to Add Recipients
Click on the “BCC” button within the “To” field. Insert your recipient email addresses and add your email in the “To” field.

Step 3: Review and Send Your Email
Review your email, confirm it looks good, double-check your recipients, and click send.
Note: Sending with BCC on Yahoo mail will typically follow the same process. Unfortunately, this method is not recommended for sending emails to over 10 recipients, otherwise you may trigger spam filters.
How to Email Multiple Recipients Individually Using Labels
Both Google and Outlook allow you to categorize your email contacts through labels.
Sending Emails to Labels on Google
Step 1: Create and Organize Your Contact List
Open Google contacts. Click on the menu Icon on your Google Workspace and select contacts.
Step 2: Add or Import Your Contacts
Click “Create contact”, select “Create multiple contacts” and add your list of recipient email addresses. Or import from a spreadsheet (You’ll see how to create the spreadsheet in the next section).
If you already have your contact list, skip to the step 3
Step 3: Create the Label
On the left sidebar, Click on “Create Label.” Name your label (e.g., Mass Email, Newsletter recipients, etc.) and click save.
Step 4: Add Contacts
Select the contacts you want to add to the label, click on “Manage Labels” and select the label you want to add your contacts to. Click “Apply”.
Step 5: Create and Send Your Email
Go back into Gmail and create your email.
In the BCC field, type the name of the label you created. It’ll pop up. Click on it and send your email.
Sending Emails to Labels Using Outlook
While there’s no “label” feature on Outlook, you can get the same outcome by creating a contact list. Here’s how to do that:
Step 1: Add Your Contacts
Open Outlook and click on contacts. Select “Add contacts” to manually input email addresses. Or, click “Import contacts” to add contacts from a spreadsheet.
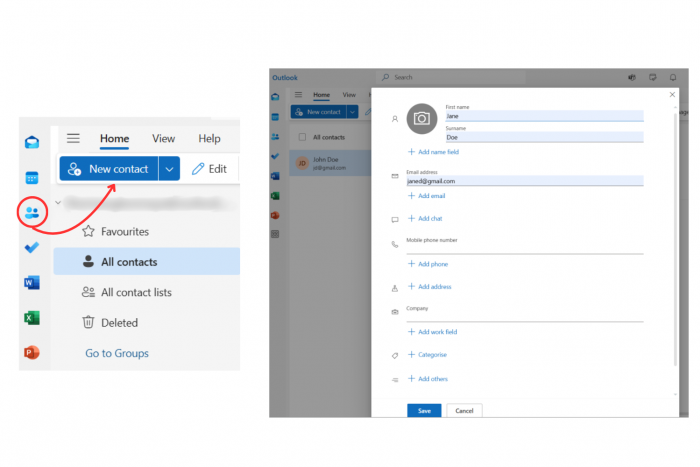
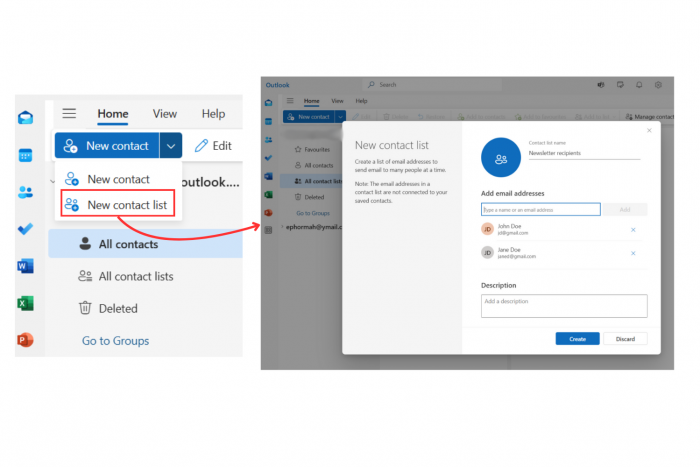
Step 2: Create a Contact List
Click the drop-down menu on the top left. Go to all contact lists. Click on Create New Contact List. Give the list a title and add your contacts
Step 3: Create and Send Your Email
Open a new email window. Type your email content, and add a subject line.
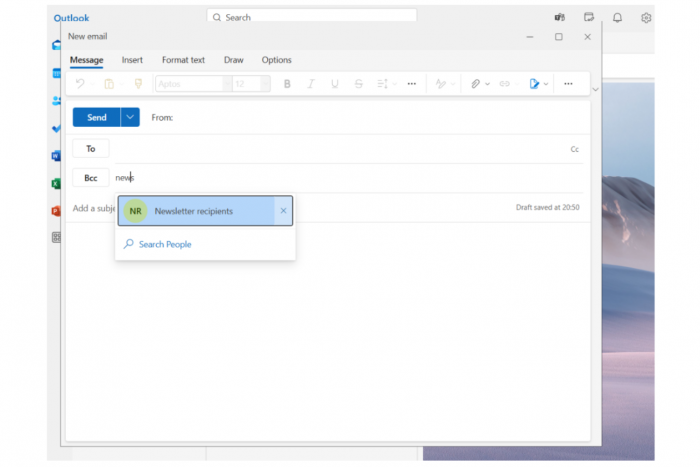
Finally, go to the BCC field, type the name of your contact list, and send your email.
How to Send Mass Emails with Unique Attachments
You can add attachments like images, GIFs, videos, or PDFs to support your message with more detailed information.
How to Send Emails with Attachments to Multiple Recipients Using Outlook
If you’re using Outlook, you’ll need a plugin called Secure Mail Merge. You can download it via “Get Add-ins” in Outlook:
Once you install the plugin, follow these steps:
Step 1: Create a Spreadsheet
Create a spreadsheet containing your contact list. Add a column for attachments alongside the columns for their names and email addresses. Insert the title of the files you want to send in the “Attachment” column. The email address should be titled “To” so Secure Mail Merge can pick it up.
Step 2: Launch Secure Mail Merge
Go to Outlook, then “Add-ins”, and launch Secure Mail Merge. A pop-up window will appear on the right-hand side. You’ll see some instructions on how to send a mail merge campaign. Select the spreadsheet option.
Step 3: Upload the Spreadsheet
Upload the spreadsheet so Secure Mail Merge can access the data. Once it notices your spreadsheet has an Attachment column, you’ll be asked to upload the files in those columns.
Step 4: Personalize, Test, and Send Your Email
You’ll find a field that allows you to further personalize your emails by inserting the first name, last name, or other attributes you included in your spreadsheet. Customize as you deem fit.
Next, send a test email to see that everything checks out. If so, you can proceed to send your email with attachments.
Send Emails with attachments to Multiple Recipients Using Gmail
To send unique attachments to multiple email addresses, ensure you have the Mail Merge Add-on in Google Sheets.
Step 1: Add your attachments
In the Google sheet with your recipient list, add an “Attachments” column. You’ll need to host your attachment on a cloud platform. Let’s work with Google Drive. Input the links to the files you want to attach.
Step 2: Start Mail Merge
Click on “Extensions”, go to Mail Merge, and click “Start.”
Step 3: Create a Template
Create a new template and specify the fields you want to merge. I.E: First name, Attachment, etc. Save the template.
Step 4: Test and Send Your Email
Go to the Excel sheet again, start Mail Merge, and select the template you created. Other fields will sync automatically, i.e., sender email, name, etc. Send a test email to yourself to check how it looks. Then go on to send your email.
Note: Keep in mind that the sent email will include the link to your attached file.
Drawbacks of Using Gmail Or Outlook to Send Mass Emails
Gmail and Outlook have strict limits on the number of emails you can send daily. Gmail, for instance, has a limit of about 500 emails daily for free accounts and 2,000 for Google Workspace accounts. Even the free mail merge tools are quite limited.
Other limitations to consider include:
- Emails sent in bulk via these platforms are more likely to enter spam folders, making your campaigns less successful.
- Neither Gmail nor Outlook provides analytics to help you see how your campaigns perform.
- The lack of personalization prevents you from creating tailored messages for individual recipients.
Also, Gmail and Outlook lack features that allow you to create more engaging designs or adequately format your emails. So, it’s harder to create professional-looking content that could appeal to your email recipients.
In Closing
As a business owner, it’s common practice to communicate with various stakeholders and prospects frequently. One great way to do that is through mass emailing. However, the process can become quite tedious without the right tools.
Tools like Voila Norbert allow you to send mass emails to multiple recipients easily. You’ll find a clean interface that guides you through creating and sending targeted emails. Features like personalization, automated follow-ups, and detailed analytics are also available to help streamline your campaigns.
Sign up for free and start improving your email outreaches today.
How to send an email to multiple recipients individually FAQs
Is there a way to send a mass email individually?
Yes, you can send mass emails individually using a tool like Voila Norbert. The email sequences feature lets you create personalized email campaigns that reach multiple undisclosed recipients.
How to send an email to multiple recipients without them seeing each other?
To send an email to multiple recipients without them seeing each other, use BCC (Blind Carbon Copy) in any email provider like Gmail or Outlook. After composing your new email, click on “BCC” and type all your recipient email addresses. Input your own email address in the “To” field and hit send.
Is there a way to send the same email to multiple recipients separately in Outlook?
Yes. Go to Outlook and create a new email message. On the far right of the “To field” click “BCC.” Insert the email addresses of all your recipients. Write your email address in the “To” field and click “Send”. All recipients will get your email.